Most beverage brands treat label design as a finishing step. They settle on a formula, find a designer, and produce something that looks reasonable on screen. Then they wonder why velocity is weak and retail buyers aren't calling back.
Great beverage label design is not just visual taste. It requires brand strategy, regulatory compliance, materials knowledge, and copy that creates a craving before the hand even reaches the shelf. This guide covers what to prepare before you open a design tool, a step-by-step design process, the elements that determine shelf performance, and the mistakes that cost brands real sales.
Key Takeaways
- Consumers decide in seconds — your label must communicate brand identity and a compelling reason to buy almost instantly
- Successful labels integrate visual hierarchy, strategic copy, FDA compliance, and material durability — not color and logo alone
- Pre-design preparation covering container specs, regulatory requirements, and brand positioning must happen before any creative work begins
- The most common failures (cluttered fronts, generic copy, wrong materials, no shelf context) are entirely preventable
- Labels are living assets: formula changes, FDA updates, and new SKUs all require a formal review cycle
What to Know Before Designing Your Beverage Label
Skipping pre-design preparation is the single most common reason labels fail — legally, aesthetically, or commercially. Reprints after production are expensive. A label that doesn't convert at shelf costs even more.
Container and Packaging Specifications
Before any design begins, identify the exact container type and the available label application zone.
Round bottles, flat-sided bottles, cans, and cartons each impose different constraints. A bottle shoulder has curvature that limits how label artwork wraps without distorting. A cylindrical can offers a continuous surface but has specific seam and fill-line restrictions.
These physical dimensions define the literal canvas for your design — not aesthetic choices, but hard boundaries that determine what's possible.
Get the following from your label manufacturer or co-packer before briefing a designer:
- Label dimensions (height × width at the primary display panel)
- Bleed zones and safe area margins
- Mechanical application requirements (hand-applied vs. automated line)
- Any container-specific restrictions on label material weight or thickness
Regulatory and Compliance Requirements
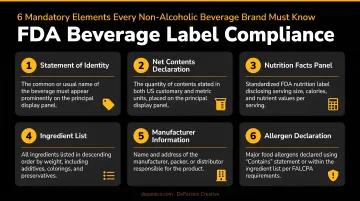
FDA labeling requirements apply to all non-alcoholic packaged beverages sold in the United States. Every label must include:
- Product name (statement of identity, prominently on the principal display panel)
- Net quantity of contents (in the bottom 30% of the PDP)
- Ingredient list (descending order by weight, minimum 1/16" type)
- Nutrition Facts panel (required format with prescribed type sizes)
- Manufacturer, packer, or distributor name and address
- Allergen declarations (nine major allergens, including sesame as of January 1, 2023)
Compliance mistakes carry real consequences: label errors represented 45.5% of 2024 FDA recall events, with undeclared allergens accounting for the majority of those incidents. Lock FDA copy before design begins. Redesigning around compliance issues after artwork is finalized costs far more than addressing them at the start.
How to Design a Beverage Label: Step-by-Step
Beverage label design follows a logical sequence — each step builds on the last. Shortcuts at any stage compound into bigger problems at production or on the shelf.
Step 1: Define Brand Positioning and Target Audience
Before touching any visual elements, clarify what your brand stands for and who your ideal buyer is.
A premium cold-pressed juice speaks to a fundamentally different person than a mass-market sports drink. Every design decision — color palette, typography weight, tone of copy — should flow from that positioning, not precede it.
Answer these questions first:
- What emotional state should this product evoke at the moment of purchase?
- What purchase triggers matter most to your target buyer (health benefits, flavor intensity, origin story, sustainability)?
- Identify what this product offers that competitors in the same shelf set don't — and make that the anchor for every design choice.
DePersico Creative's SWIFI process (Strengths, Weaknesses, and Ideas For Improvement) formalizes this phase, answering the four questions shoppers subconsciously ask at shelf: What is this for? What will I experience? What do I want from this category? What does this product offer that others don't?
Step 2: Audit Competitors on the Shelf
Research what competing products look like in your actual retail environment — not on packaging inspiration sites, but on the specific shelves your product will occupy.
Note dominant color patterns, typography styles, and label shapes across your category. Then identify visual white space: the colors no one is using, the design approaches that feel absent, the emotional notes no competitor is hitting. That gap is where your label can own a position.
This is the concept of shelf blocking — evaluating your label against a wall of adjacent products, not in isolation on a white background. A design that looks distinctive on its own can disappear when surrounded by ten similar products at retail.
Step 3: Develop Visual Hierarchy and Layout
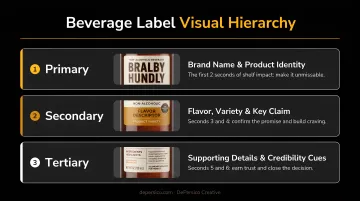
Those competitive gaps inform exactly what your label needs to lead with. From there, establish a clear three-tier hierarchy:
- Primary level — brand name or hero image, readable from 3–5 feet away
- Secondary level — product type, flavor, key claim, readable at arm's length
- Tertiary level — ingredients, nutritional facts, accessible on close inspection
Design the front panel first. Resist the urge to load it with every piece of information about the product. The back panel exists for regulatory copy, extended brand story, and supporting claims. Front panels that try to communicate everything communicate nothing.
Step 4: Write Copy That Creates a Craving
The words on a label are as strategically important as the visuals. Product descriptors, flavor callouts, and taglines must each earn their placement — chosen to trigger an emotional response and communicate the product's key benefit within seconds.
Vague language wastes label real estate. "Refreshing." "Great taste." "All-natural." These phrases appear on thousands of labels and register as noise. Specific, evocative copy — the kind that makes a shopper think that's exactly what I want — drives trial.
DePersico Creative calls this discipline creative linguistics: finding the precise words that translate a product's best quality into an immediate craving. A few practical principles:
- Drop generic descriptors in favor of sensory specifics ("slow-steeped for 12 hours" vs. "rich flavor")
- Lead with the benefit that matters most to your buyer, not the one easiest to say
- Test front-panel copy against competing products — if your phrase could appear on three other labels, rewrite it
The Sea Best® redesign demonstrates this. Consumers were passing the brand despite its quality. By minimizing cluttered copy and using creative linguistics to showcase the most important product features, the brand successfully repositioned its products as restaurant quality.
Step 5: Select Materials, Finishes, and Print Method
Match label material to the product's actual environment — not just its appearance in a mockup.
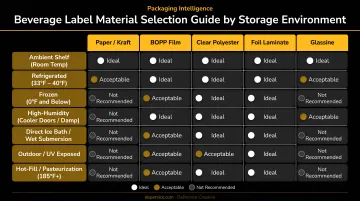
Material guide by environment:
| Environment | Recommended Material | Watchout |
|---|---|---|
| Ambient shelf-stable | Paper or coated paper | Avoid if any moisture exposure |
| Refrigerated | BOPP/polypropylene | Confirm water-resistant vs. waterproof spec |
| Ice bucket / condensation | Vinyl or PET film | Cost and recyclability tradeoffs |
| Shipping/abrasion exposure | Polyester/PET | Over-specifying raises cost unnecessarily |
Finish options — gloss, matte, soft-touch, spot UV, foil stamping, embossing — affect both brand perception and print cost. Premium finishes increase perceived value at shelf, but they also increase per-unit cost. Align creative intent with production budget before finalizing artwork, ideally in direct conversation with your label manufacturer.
Key Design Elements That Determine Label Performance
Typography
Choose fonts that reflect brand personality and hold up at small printed sizes. A script font that looks elegant at 200pt on a monitor can become unreadable at the 12pt size it occupies on an actual label.
Rules to follow:
- Test typography at actual printed label size, not just on screen
- Use no more than two to three typefaces — one for the brand name, one for body and descriptor copy
- Ensure the primary brand identifier meets FDA's minimum type size requirements for the statement of identity
- Script and display fonts require wider letter-spacing to maintain legibility on curved surfaces
Color Strategy
Color works through category fit — it functions as a signal that either matches or disrupts consumer expectations for your product type.
Research published in Frontiers in Nutrition found that packaging color interacts with product type through perceived fluency to influence purchase intention. These associations only work when they're congruent with what the product actually delivers.
Greens and whites signal health and cleanliness. Bold reds and oranges communicate energy. Blues read as hydration and purity. Match the palette to the product promise — or the label works against you.
Color also behaves differently across contexts:
- Under fluorescent retail lighting vs. natural daylight
- On refrigerator doors with condensation and backlighting
- On product listing pages in e-commerce settings
Test label colors in physical mockups across all relevant environments before approving final artwork.
Imagery and Visual Elements
Every image on a beverage label should earn its place — clarifying flavor, functional benefit, or quality tier, not simply filling space. A 2025 study on packaging design confirmed that visual packaging elements drive purchase intention through brand experience.
High-quality photography or illustration of ingredients, consumption moments, or brand icons gives shoppers an immediate read on what the product delivers. If an image doesn't make the product more legible or more desirable, it's clutter.
Information Hierarchy and Compliance Copy
Mandatory regulatory information must be present and legible — but it shouldn't compete visually with the brand story. Use font sizing, color contrast, and panel separation to distinguish the marketing message from compliance copy.
Watch for these common compliance oversights:
- Ingredient list type below FDA's 1/16" minimum
- Allergen "Contains" statement not matching the ingredient list type size
- Net quantity placement outside the bottom 30% of the principal display panel
- Nutrition Facts panel using non-standard formats or incorrect serving sizes
Common Beverage Label Design Mistakes That Cost Brands Sales
Most label failures share the same root causes: lack of strategic intent, poor pre-production planning, and underestimating how different a label looks in-store versus on a screen.
Here are the most common mistakes — and what to do instead:
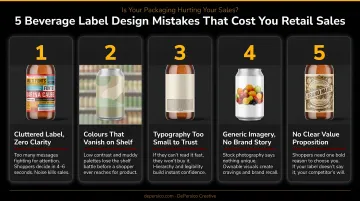
Designing without a shelf audit. Brands that design labels in isolation, without studying how they'll look placed next to competitors, consistently produce designs that look fine alone and disappear on shelf. Evaluate every design candidate in a competitive planogram or physical mockup before approving.
Overloading the front panel. Trying to communicate flavor, certifications, health claims, brand story, and origin on the primary display panel creates visual noise that causes shoppers to disengage. One hero claim. One dominant visual. One clear brand name. Everything else belongs on the back.
Using weak or generic copy. Labels that rely on clichéd language ("crisp," "refreshing," "all-natural") miss the opportunity to differentiate. Every word on a label is a micro-conversion tool. Before committing to production, run a structured copy evaluation — DePersico Creative's SWIFI assessment, for example, pinpoints exactly where visual messaging and language are falling flat.
Choosing materials without testing. Selecting label stock based on price alone, without testing under actual storage and handling conditions, produces labels that peel, fade, or look damaged at retail. A label that peels in an ice bucket is a specification problem — one that should have been caught before the product ever shipped.
Skipping SKU-level planning. Brands launching multiple flavors often design each label independently, creating a fragmented shelf presence. A cohesive label system — where core brand elements stay consistent and only a color band or flavor name changes per SKU — strengthens shelf recognition across the entire line.
When to Redesign Your Beverage Label
Not every label problem requires a full redesign. But several indicators point clearly to a label that's actively costing sales.
Signs Your Current Label Is Underperforming
Watch for these signals:
- Weak velocity at retail despite adequate distribution and promotion
- Frequent buyer or consumer confusion about product type or flavor
- Consistent feedback that the product "doesn't look premium enough" for its price point
- A formula or ingredient update that makes the current label misleading
- New competitive entrants that have made your label look dated
- FDA compliance updates that affect Nutrition Facts format, serving size, or allergen declarations
NIQ data shows that 9 out of 10 packaging redesigns fail to make a meaningful commercial difference — meaning most redesigns are aesthetic refreshes, not strategic interventions. But when redesigns are executed against documented underperformance, the same research shows optimized package designs average a 5.5% lift in forecasted revenue.
How to Evaluate Before Committing to a Redesign
Before launching a full redesign, diagnose what specifically is failing: visual hierarchy, color system, copy messaging, material quality, or regulatory compliance. A different-looking label with the same underlying strategic problems produces the same results.
Great beverage labels are built on strategic foundations — clear brand positioning, regulatory compliance, smart material choices, and copy that connects with buyers. Skipping those foundations is why most label redesigns don't move the needle.
DePersico Creative has spent over 45 years helping food and beverage brands — from startups to national names like Kellogg's and Campbell's — build that foundation before touching a single design element. Treating the label as a strategic selling asset, not just a design project, is where a meaningful redesign actually starts.
Frequently Asked Questions
What must every beverage label legally include?
FDA requires six elements on all non-alcoholic packaged beverage labels: product name, ingredient list, net quantity, manufacturer or distributor name and address, Nutrition Facts panel, and allergen declarations for the nine major allergens. Missing or non-compliant elements can trigger recalls, retailer removal, or FDA enforcement action.
How do I choose the right label material for my beverage packaging?
Match material to the product's actual environment: BOPP or polypropylene for refrigerated and condensation-exposed products, vinyl or PET film for ice-bucket or harsh-moisture applications, and paper only for dry ambient-shelf products. Always test under real storage and handling conditions before committing to a production run.
What makes a beverage label stand out on a crowded retail shelf?
Four factors drive shelf standout:
- Brand name readable from 3–5 feet away
- A dominant hero element that creates an immediate impression
- Color strategy built against your specific competitive set
- Front-panel copy that communicates the key purchase trigger within seconds
Always evaluate labels in a shelf mockup against adjacent competitors — not on a white background.
How does the shape of the bottle affect label design?
Bottle curvature, shoulder shape, and the available flat labeling zone determine label dimensions, wrap style, and how artwork distorts when applied. Know these container specs before design begins — artwork built for a flat surface often breaks on a curved container, requiring costly revisions or reprints.
When should I hire a professional designer or agency for my beverage label?
Professional design pays for itself when launching into retail, pursuing major grocery placement, repositioning for a new audience, or recovering from underperforming shelf performance. Lost sales, emergency reprints, and retail delisting from poor label design consistently cost more than doing it right upfront.
How many design elements should appear on the front panel of a beverage label?
Front panels perform best with restraint: one primary brand identifier, one key visual, and one dominant claim or descriptor. Certifications, extended claims, and brand story belong on side or back panels. Shoppers who can't immediately identify what a product is and why they should want it simply move on.